


This is the first in our series of articles about SY Esper’s complete refit in Thailand for Sailing Today magazine.

The interior of SY Esper, our Oyster 435, took a beating when the saloon hatch broke open during a storm in the Indian Ocean, but the veneer had been steadily deteriorating for some time before that. She was 25 years old, and our old girl needed a face lift. Mindful of the price of wood veneer, we looked for different options like paint effects or simple white laminate to keep things bright. But no decisions could be made until the wood was stripped away and we could see what was going on underneath.

The carpenters got to work with their chisels. It was satisfying seeing the warped, flaking and discoloured patches disappear, but painful to see the good stuff go. Underneath the peeling veneer, freshly-revealed ply appeared in good condition. We replaced old carpet lining inside most lockers with smooth white laminate, which makes life more difficult for cockroaches and other pests to gain a foothold.
Read Introduction
Coming soon:
- Part 2: Deck
- Part 3: Hull
- Part 4: Electrics and electronics
- Part 5: Conclusion and costs
 One of the difficulties in managing a project of this scale is keeping a handle on the big picture. Sometimes this meant removing ourselves from daily manual labour to spend time on research. Updating and repairing the interior was one of the main reasons for undertaking the refit so we wanted to get it right. We borrowed ideas from interior design magazines, placing a whiteboard in the saloon on which we created a mood board with photos, torn magazine pages and colour samples. We shelved the idea of paint effects when we discovered how reasonably-priced wood veneer is in Thailand.
We applied the veneer with the grain running horizontally, and removed the dated, raised trim surrounding the locker doors. Both these changes trick the eye into believing the interior is wider than it really is. Keeping things bright, we chose ‘White Vine’, the palest veneer available. We matched the solid ash features with a limewash effect, first by painting the wood white, then sanding back to a thin film so that paint remained in the grain. We finished with satin polyurethane rather than varnish to avoid a yellowing effect.

In the galley we chose brushed steel laminate, which is much easier to keep clean than veneer. While exploring the laminate warehouse, we stumbled across a tomato-red full gloss sheet, which we snapped up to add a colourful accent to the galley’s end wall. In a moment of serendipity, one of the carpenters got excited by this shiny colour and applied it along the full length of the upper recessed shelves. It looked great, so we kept it.
We replaced the white laminate throughout the aft heads, added a smart flecked white composite stone sink surround, and applied semi-matte fuchsia and lime laminate on opposing walls. The composite was an off-cut donated by another yacht owner. During the year we spent in the yard we received and donated all kinds of materials; nothing ever went to waste, often saving us all time and money.
Everything we do is FREE! Feel like spreading a little love? Join our crew and become a Followtheboat Mate for less than the price of a coffee! ☕
The most exciting changes were made to the layout. After seven years of living aboard, we knew what we wanted to change. Sockets were in the wrong place, cabin space was wasted, the chart table design was not practical, we didn’t need two heads, the shower room was a luxury we had turned into a storage area long ago, the fridge door was cumbersome and the saloon table was too big. We realised pretty soon we would never have a chance to refit like this again.
CHART TABLE
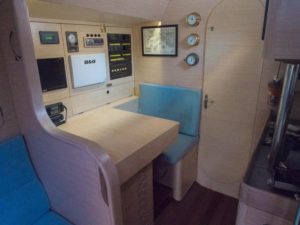
The boat had come with a large chart table running amidships along the starboard side, under which a swingout stool was secured when not in use. With the advance of electronic navigation, we were using charts only as back up and had no need of a large table. Jamie coveted a classic small table with forward-facing seat which he would be able to use as an office. The carpenters built a completely new area, including a cabinet of small drawers for all those important tools and essential bits of kit.
FOREPEAK
The traditional layout consisted of a door leading off the saloon into a small corridor, with bunks on the starboard side. On the port side was a door to the forward heads, and another door led to the fore cabin in front. In the heads were two more doors, one to a stand-up shower room with a seat and shelves, the other directly into the fore cabin: five doors!
Although there was plenty of room in the forepeak, it was hopelessly laid out for long-term liveaboard purposes. Within two years of moving on board we turned most of it into a storage area and workshop, removing all the doors, apart from the one dividing it from the saloon. Guests slept on the bunks or in the saloon.

We opted to radically re-design the area. Liz needed a quiet area to work, and the forward heads/shower space seemed like a good option. Without touching the bulkheads, we removed the partition walls and opened up the area. We added a curved wall feature to give Liz’s open-plan office some style. The bunks were still useful for storage which could be removed if we needed them as beds, and we didn’t touch the fore cabin, which was now easier to access without the doors. The toilet and shower were removed and through-hull fittings filled. This gave us an easily accessible place underneath Liz’s new bench seat to plumb in the watermaker. With striped upholstery, a curved wall, swing-up table and lots of new shelves and lockers the forepeak is now a smart and practical space.
CABIN
Storage in the main cabin had been a sore point. There was a small wardrobe and inaccessible locker on the starboard side, and a redundant third berth to port. To gain storage space, we built shelves into the wardrobe, doubling the amount of clothes we could store, and removed the third berth to create a double row of lockers. We also cut out a large panel and created a new locker where the cavity containing exhaust and fuel pipes had been. For safety’s sake, we installed a fume detector.

SY Esper has been home for nearly 10 years, so it is crammed with belongings and souvenirs from our travels. Building the extra storage was almost the most exciting aspect of the whole project. When the interior was finished, not only did it look beautiful, but we had whole lockers now standing empty.
USEFUL LINKS
🛠 FOLLOWTHEBOAT REFIT VIDEOS
Becoming a Followtheboat Mate doesn’t float your boat? You can still help us! Please SHARE this post to spread the word…
If you like our content and would like to support us, we will give you ad-free access to our videos before they go live to the public, discounts in our shop, access to Jamie’s iconic full-res photographs, and supporter-only blog posts. Click our ugly mugs for more info!

Hi
My name is John from New zealand and 1st time viewer of your channel and loved it. I have just viewed the post about issue you face when posting videos such as negative haters etc. I loved your openess and honesty and just subscribed. Were you filming in NZ, the location looked familier like Whitianga. Jill my wife and I are 70 and 75 with a Catalina 34 based out of Westhaven in Auckland and just started our sailing channel. Pure hobby and love doing it. Always learning and improving. Gotta go and view more of your adventures. Love to hear from you. John and jill Bourne. ‘Trader Jack’
Hi John from NZ, so glad to meet you!
That particular episode was filmed at Krabi Boat Lagoon marina in Malaysia – we had a lot of fun putting it together, and we tried not to pull any punches. We’re pleased to know you enjoyed it. Jamie loves NZ, but I’ve never had the fortune to visit… yet!
Do feel free to comment on any of our content, we love to hear from those who take the trouble to watch and read what we do. Peace and fair winds!
I look forward to the updated walk through! Cheers.
We lost the originals, which is why this is so long in coming, but now are adapting the pdf articles for the blog. They pretty much follow our original Sailing Today pieces with some additional images where possible. It’ll be great t o have them all here in one place. Peace and fair winds! Liz, Jamie and Millie