
It was a frustrating week for me but the workers continue to crack on. Things are starting to take shape and the painters have already begun their work.

Week Five Summary Video
Before we go into the details, here’s our weekly summary clip of the work undertaken in week five. Don’t forget to go full-screen and increase the playback quality.
[youtube id=”PdEdOx57FBE” width=”600″ height=”350″ autoplay=”no”]
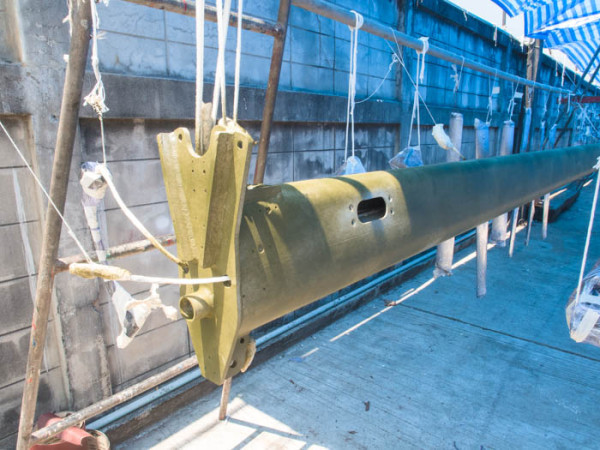
Mast Primer
We’ve had up to seven painters working on Esper at any one time. So far it’s all been about preparation, both the top sides and the masts. This week the tent that was erected around the suspended masts was extended and is now 50m in length! The lads finished off the preparation, which included paint removal and grinding, and spray painting has begun.
First to go on was the marine etch primer, of which two coats was applied.

The primer goes on like candy-floss and is rubbed back before a white under-coat is applied.

The other mast extrusions have been covered in clingfilm and the priming continues next week.
Filling In The Blemishes
The painters, having sanded the top sides, were able to identify imperfections and circled them with a pencil. The guy tasked with filling the blemishes then went round the hull and applied marine filler.

Deck Boxes
Esper’s rear deck boxes, situated at the back of the boat, were both ugly and rotten. They were, however, extremely useful and also made great seats. Rather than replace them in teak we opted to build them in to the deck since we are now losing the deck and going with a fibreglass base. This gave us the opportunity to redesign the boxes, whose original straight lines clashed with the curvature of the boat. Un used Autodesk to design the boxes and set Moo and Lek with the task of epoxying fibreglass to both sides of a sheet of honeycomb.

Once dried, and it didn’t take long in this heat, Moo drew the design onto the honeycomb and cut out the shapes with a sharp knife.

Using the same trick that carpenters use to bend ply, Moo scored out tracks using an angle-grinder in order to bend the corners. These were then clamped into position and the base epoxied into place.


With the bases glued in, Moo is now creating a lip inside the box to act as a drain. Next will be the creation of the lids.
Forestay Woes
During our crossing from India to Malaysia, we incurred some problems with our forestay. It jammed intermittently and, after inspecting the drum, concluded that it was a problem with the cable or the foils… or both. This meant taking the entire forestay furling mechanism apart, a job that proved frustrating no least because of corrosion, and the added fact that the fittings are all American imperial!
It took a lot of brute force, drilling out of corroded bolts and some patience just to remove the drum. Next was the Norseman fitting on the end of the cable that required about an hour’s worth of gouging out of Sikaflex. Eventually all this was removed and the task of removing the brass connectors could begin.

It took Liz’s keen eye, and another read through of the manual, to conclude that the connector pipes inside the foils needed to be removed first, and there lay another afternoon’s work. After three days we have still not removed the pins, but I’m confident now that we can make some repairs and fix the current mech rather than buying a new one (£2k upwards).
The problem, by the way, was my initial suspicion: the top foil had been ripped by a caught halyard. Made of aluminium, it sheared off a shard which fell inside the foil. It got caught in the cavity and prevented the foil from turning around the cable. This would explain the intermittent performance of the sail and why sometimes it would turn and sometimes it wouldn’t, so whilst we haven’t fixed the forestay, we at least know where we stand with it. I supposed I should see this as progress.
Replace Bearings
One of the interesting aspects of this whole process is breaking the boat down into its component parts. The mast came down, the rigging comes off, the rigging points are removed, the bolts are labelled and bagged, and the furling mechanisms are taken apart and stripped back to their own component parts. It’s a process that helps us understand how the boat is put together, and gives us an opportunity to thoroughly inspect corrosion or failure of the parts. One of the things we’ve been keen to do is inspect the bearings of all furling mechs (we have four: two in-mast and two foresails). A few of them have remained in tact but take a look at the bearings of the foresail drum, which are a mix of Torlon and stainless:

You can see the Torlon bearings have been worn right away, which explains the ‘bumpy’ feeling as one moves the drum. The races (the stainless lip that the bearings sit in) are also pock-marked with dents, making the bearing travel stiff. All of these need replacing. Fortunately Hood still make these.
Much thanks to Duncan of Maggie Drum who spent considerable time with me battling with the forestay. Being a pragmatic farmer he was able to apply some useful ideas which helped expedite the forestay removal.
Mast Fitting Repairs
Some of the mast fitting bolts had to be drilled out from the aluminium plates that hold the spreader, which meant we ended up with ripped holes. Fortunately the workshop at PSS was able to weld in the holes and Moo re-tapped them.


Liz’s Study
The most exciting progress made this week is the installment of the curved wall in Liz’s office, the watermaker box, which doubles as a seat, and the drawers behind.


The final design of Liz’s Study was rather organic, changing as we progressed with the project. Ton and Tui, to their credit, were extremely patient as they installed a shelf and then removed it again after we changed our minds.

Tool Drawers
Pong continued with the chart table installation and glued in white formica to what will be the electric circuit cupboard. On a whim, having seen Duncan’s shallow tool drawers on Maggie Drum, I decided to make the front-facing cupboard under the chart table a drawer cupboard instead. The drawers are small, so I’ve yet to find a home for larger spanners, hammers etc, but the daily tools I use like Allen keys, small spanners and electrical tools, will have a new, more convenient home.

Hull Grinding
Lek, who has spent the last five weeks grinding the hull, has now finished! He went round it four times in the end. I’ve no doubt the hull could have been peeled back quicker by more people with more efficient tools, but we’re pretty happy with his progress. It has also meant we could inspect the hull at each layer to ensure all osmosis is being tackled.
Lek will now be moving on to the deck. With almost all teak removed the faring will begin.

What’s Next?
The deck faring can now begin, which means more grinding and dust unfortunately! Liz’s study is almost complete save for the cupboard doors, whilst the chart table is expected to be completed too. We are now thinking of some additional carpentry in the cabin. Meanwhile the painters will continue to apply the etch primer and basecoat to the masts. The multi-tasking Moo, meanwhile, will probably finish the deck boxes and move onto the cockpit box.
Oh, and apparently our veneer is being delivered soon. I know Ton is itching to start laying this up!
If you like our content and would like to support us, we will give you ad-free access to our videos before they go live to the public, discounts in our shop, access to Jamie’s iconic full-res photographs, and supporter-only blog posts. Click our ugly mugs for more info!

Are you using ply as opposed to mdf? is this because it will weather better, even though it is heavier? Why don’t you go for a table like my camper van,a rail with two clips and a fold out leg.
Sounds interesting. Got any pics? Our old table was MDF, funnily enough, but we’re using ply for the veneer. We’re thinking of a solid-wood table though.
Hi guys. Your videos are great. The work is daunting in that heat but rather that than ten below! It all looks amazing. At least you’re taking breaks to get some good food and lots of liquid. I can hardly wait to see it when I get back to Langkawi.
Hehe, that damn dusty office, Vyv. They’re putting the veneer up already and the painter has said he wants to start priming the top sides already. We haven’t even chosen the paint yet!
Looking good, significant progress is evident. The sense of expectation must be enjoyable for you, clearly shown in the part filmed in the new office.
Gob-smacking in scope. Makes my annual coat of anti-fouling look a bit pathetic!!
Hehe 🙂
Happy Birthday Jamie. have a great dayxx
Thank you, Sam. Hope you and your family are keeping well. Lots of love from Thailand xxx
Coming along. Will be there to inspect in 3 weeks. Have a great birthday today!!
Thank you, Kanna. Hope you are well.
Its looking good , you are lucky Dom Is back cooking, we enjoyed her food.
Dear Pat and Tony. Good to know you understand our sentiment towards Dom and her cooking. Great food! Hope you are both keeping well.
good job jamie
Amazing progress despite the heat. All those ball bearings to find a home for! Why don’t you put in a new saloon table that doubles as a bed extension?
Dear Pa, we did consider that but then we realised that would offer more beds for more guests. We’re ring to reduce the number of bunks, not increase them!
many many happy returns of the day buddy.may all ur thoughts come true