


Week Two of Esper’s refit has progressed nicely. The pace has been maintained and this week we concentrated on the removal of both the mizzen and the main masts. We also had the electrician, the mechanic and the plumber on board to discuss a number of projects.

Mast Removal
The biggest event this week was the removal of the two masts. We had to pre-book the crane so it was paramount that we disconnected all electrical cables from the base of the masts. The mizzen is deck-stepped (as in it stops at the deck) but the main is through-hull, so getting to those cables involved pulling up floor boards and rummaging through dirty bilges.
")
Un, our project manager, coordinated the removal. He used the two carpenters, Ton and Tui, and Lek, the Burmese lad who has been grinding our hull.
The first task was to send Lek up the mizzen to undo the triatic, which is the cable that connects the main to the mizzen. Fortunately Lek is a young whippersnapper so winching him was quite easy! After this the crane was then able to hoist him up again to put a slip around the mizzen, connected to large hooks at the end of the crane.
The mizzen was fairly straightforward and easy to drop into a horizontal position on two oil drums.
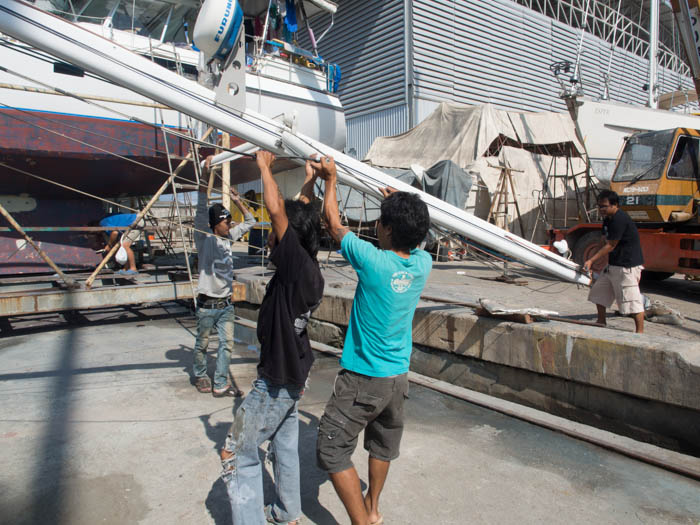
The main was a little more problematic, but only because two rubber wedges, used to hold the mast in position when upright, had to be removed. I don’t think they’d moved for twenty years so getting them out took about 15 minutes.

Once removed the crane hoisted the main whilst Ton stayed down below to ensure the cables came out ok.
The two masts were then masterfully positioned at the back of the yard by a crane operator who deserves some recognition for his deftness behind the joystick. Moving a 20m metal stick in between parked boats was no mean feat.
Mast Removal In Glorious High Def!
For those who have never seen this kind of operation before, we’ve put together a short clip complete with commentary. It includes clips of both the main and the mizzen but put together in a logic order so you get a feel for the complexity of the task.
[youtube id=”I4uvDiYxHlA” width=”700″ height=”400″]
Mizzen Mast Fittings Removal

In the sweltering heat, Un’s brother, Moo, was tasked with assisting in the removal of the fittings to the mizzen mast.
I was hoping we’d complete this in a day but many of the bolts, stainless steel into aluminium, had corroded somewhat and had to be drilled out.
I’ll be honest, I did the easy bit and left Moo to struggle with the obstinate ones. He did a great job though, and had removed all fittings by Saturday afternoon, leaving next week to concentrate on the main.
Taking the furlong roller out the mast was quite interesting, since we didn’t have a guide on how to do this.
In the end it was quite straightforward, requiring a drop-catch to be lifted up in order to rotate the furler and unscrew it from the base.

Rewiring Plans
Initial discussions were had with Sambat, the electrician who has been working on the large motor-boat, Thea. He speaks good English and seemed unphased by our discussions on rewiring the boat. Fortunately this is an area I’m familiar with so it should be quite satisfying working with Sambat on this project. The aim is to:
- rebuild the distribution board
- add in new breakers
- update existing breakers
- rewire the batteries and Sterling AB charger
- rewire the solar panels
- install new navigation equipment
All of this is dependent upon the chart table relocation.
Chart Table Relocation Plans
The chart table will be chopped in half and a seat added to face forward. The distribution panel area will be widened by the removal of the chart table portlight. Liz and I have made the decision to glass-fibre this in and lose the window altogether. This will free up a lot of space in the chart table area and make the rewiring much easier.
Stripping of Engine
The engine is getting an over-haul so we’ve employed a local mechanic to strip the engine, including the flexible coupling, transmission and heat exchanger. We’ll then employ someone to clean the engine before it is repainted.

Deck Fittings Removal
Ton and Tui continued to remove the deck fittings. Esper is an over-rigged ketch cutter, so the amount of fittings are rather more than your average 43ft boat.

Interior Design

With the pace of work moving quickly it will soon be time to order the materials for our interior, so now Liz and I are pouring over Formica and veneer catalogues. We have a few ideas and don’t really want to go back to an all-ash interior. We want to freshen it up a bit and give it a modern make-over. This has included discussions on losing the curved trim around the cupboard doors, which is a significant rebuilding job. No decisions have been made just yet.
Stripping of Gelcoat
With much of the osmosis points ground out the gelcoat is now being taken back to reveal all osmosis points. This is flushed down every day with fresh water.


Week Two Video Summary
Here’s a brief over-view of week two’s progress, presented by a Mexican bandit.
[youtube id=”sOurIAvc-qM” width=”700″ height=”400″]
What’s Next?
The two carpenters will continue to remove the deck fittings and hopefully start removing the deck itself. Moo will continue to remove the fittings from the main mast. The electrician should start his project and we have the plumber in too, who is undertaking the nasty job of removing and cleaning the holding tank. Rather him than us!
If you like our content and would like to support us, we will give you ad-free access to our videos before they go live to the public, discounts in our shop, access to Jamie’s iconic full-res photographs, and supporter-only blog posts. Click our ugly mugs for more info!

Can you tell us how the wood veneer is removed to make ready for new?
Hi Dave. The veneer is simply stripped off using a chisel or scraper. The carpenters are careful enough that they don’t destroy the surface underneath. Also bear in mind we are removing and replacing the veneer because it has come away in places, so the glue used originally has lost much of its stick. We notice in places the glue was only used sporadically, and not completely covered. This makes it easier to strip.
I am really impressed by this information. These people are so skilled at what they do, making an overwhelming task seem like a walk in the park. Keep those videos coming but do let me know when the machetes and kung fu action starts.
You seem to have lots of support, hope it’s not costing too much! Look forward to the next episode.
Ray & Pam
Bintang
Thanks, Ray. Without the support I’d still be struggling with the first bolt! Love to Pam, hope Bintang is looking after you both.
Ask for Bee, she’s cool and speaks good English(at the bar).
She’s making new friends in our new home, Dan. She’s taken in a little street urchin with identical colouring; they could be sisters. I think we’ve found your karaoke bar, btw.
Whats Milly doing while this is going on?
Massive undertaking but at least it looks as though you can rely on the weather! The Osmosis issue looks quite severe, has the hull had previous major treatment? Are the yard and labour costs high?
Wishing you the best of luck will follow your progress.
No, this is the first treatment, Darrell. Fingers crossed its the lady too. Labour is certainly cheaper than Europe, but that’s because we’re in the south. Phuket is more expensive.